
If you want to run a business or generate passive income online, you need a website.
I created my first website back in 2005 and it cost a lot of money and time.
Setting up a website in 2018 has come a long way since then. You can be online in as little as 15 minutes. The cost has come down drastically. You don’t need any technical knowledge either.
Step #1: Choose a website platform
I created my first website using HTML and CSS. But soon, I realized that adding and updating pages was a pain.
That’s when I discovered the free content management platform, WordPress.
Back in 2005, WordPress was a blogging platform. In 13 years, it has evolved into a complete website management platform.
WordPress powers almost 30% of the websites on the internet. There are 50,000+ free plugins that enhance the functionality. There are probably more than 100,000 free themes available to make your site look more appealing.
Use WordPress to power your website. It’s easy to manage and is secure.
Looking to build an e-commerce site to sell products online?
WordPress can do that as well. Install the WooCommerce plugin to get e-commerce functionality.
However, a better alternative for a shopping site is Shopify. It’s built for e-commerce and dropshipping business.
Step #2: Choosing a domain name
Just like your phone number, a domain name like google.com or facebook.com helps people identify how to reach your site.
When you are starting off, don’t worry about getting the perfect name. Find an acceptable name that’s available and go with it.
Step #3: Register your domain name
I use Namecheap for all my domain name registrations. However, I recommend Siteground for hosting your WordPress website.
If you register your domain on NameCheap and buy hosting through Siteground, make sure the nameservers are set up correctly. Your website will not load otherwise.
Managing hosting and domain name separately can be complicated for beginners. Keep it simple and buy your domain name through Siteground while setting up your website hosting.
Step #4: Buy hosting for your website
Your website needs a home on the internet. When you type in your domain name, your browser should be able to fetch the relevant files from a server and show it to you.
That’s why you need hosting for your business website or blog.
Head over to siteground and choose their WordPress hosting service. It’s the simplest way to get started. Their servers are optimized to run WordPress.

Pick the startup plan
When you are starting out, the options can seem a bit complicated. Pick the startup plan and you can upgrade easily as your website traffic grows.

Choose a domain
Based on whether you already have a registered domain name, or want to register a new one, make your selection and proceed.

Review and complete
Add your billing details. There are a few things to change on the “Purchase Information” section.
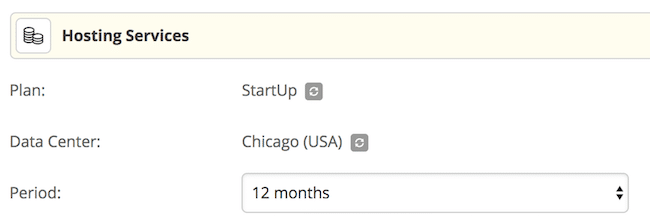
1) Choose a “Data Center” that’s closest to your audience. If you are targeting Indians on your website, choose “Singapore (SG)”. The closer the data center is to your audience, the faster your site will load for them
2) While it’s tempting to go for a longer duration and lock-in the lower price, I’d recommend sticking to a 12-month payment plan. You can renew it every year.
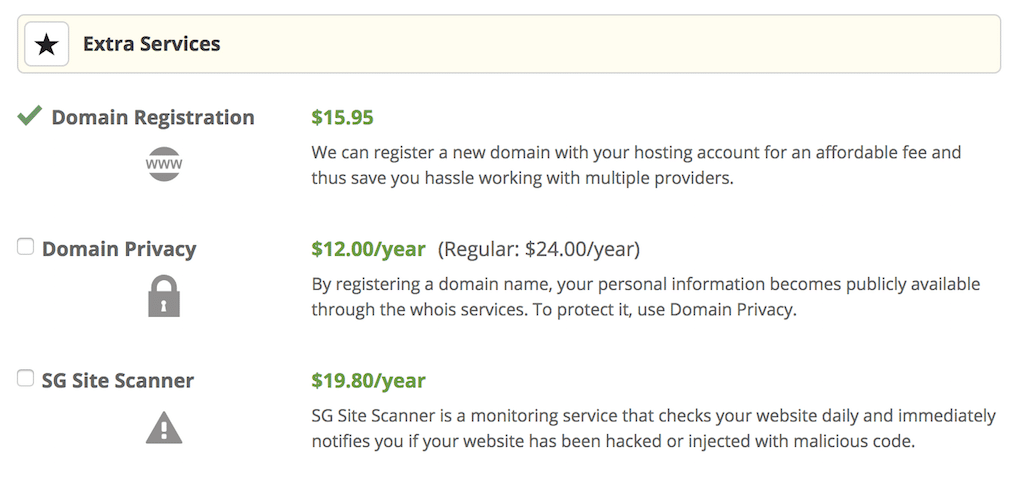
3) Save money by removing “Domain Privacy” and “SG Site Security” from the extra services by unchecking those items. You don’t really need them.
Once you complete the payment, you should have your hosting set up in less than 30 minutes.
Step #5: Set up WordPress
If you are using Siteground, use their WordPress install wizard to set up your site in a few minutes.
Step #6: Familiarize yourself with WordPress
If you are new to WordPress, check out the WordPress Tutorials.
Step #7: Add plugins to make WordPress better
One of the great things I like about WordPress is the developer community around it.
If there’s something you want to add to your website, there’s a good chance a plugin with the required functionality exists.

When I start a new site, I normally add the following free plugins.
1) All in one SEO - A great SEO plugin. I used to be a fan of the Yoast SEO plugin. However, they have added so many features and bloated it. It’s downright confusing to use now.
2) WP Super Cache - A useful caching plugin to speed up your website.
3) Contact Form 7 - Contact form functionality for your site.
4) Akismet - Anti Spam plugin. Even though you need a WordPress.com account, it’s free. Even for low traffic websites, you will easily get hundreds of spam comments a week.
5) Wordfence Security - A security-focused plugin. It works out of the box. However, if you are just starting out, you can skip installing this plugin.
Step #8: Make your website more personal
Choose one of the default themes from WordPress. You can always switch themes later.
Add the following pages:
1) About page. Write a little bit about your background. Tell people how you intend to help them.
2) Privacy Policy. Use this free service to generate one for your site
3) Contact Page. You’d want prospective clients/partners to contact you, right? Use the “Add Form” button on the page to add a pre-created form to a page.
Step #9: Start building an email list
It’s important for business owners to have a way to communicate with their readers and clients.
Building an email list is the best way to have a more meaningful conversation. I recommend using Aweber for your email marketing needs. If you are on a tight budget, sign up for MailChimp.
Step #10: Start measuring
To ensure your business venture succeeds, you should measure performance. A very simple measure of whether you are doing something right would be - the number of people visiting your website.
Google Analytics is a great free tool that helps you do this.
Google Analytics Dashboard for WP plugin helps you add Google Analytics tracking code to your site without coding. It will also show you Google Analytics data on your WordPress dashboard.
If you have reached this far, congratulations. You are already ahead of the 99% of the people who start and give up midway.
Over To You
Do you have any questions? Stuck somewhere? Add your questions below in the comments section.
If you need help, get in touch with me.


Can i participate a part time job